


Section 1: Overview
HTML (hypertext markup language) is the most predominant markup language for pages on the World Wide Web.
- It is the language that a browser uses to interpret and display documents.
- It provides a means to describe the structure of text-based information in a document – by denoting certain text as headings, paragraphs, lists, etc. – and to supplement that text with forms, images, and other objects.
The original version of HTML was developed by a physicist named Tim Berners-Lee in the 1980s.
- As the Web has grown in popularity and undergone several changes, so too has HTML.
Components of a Web Page
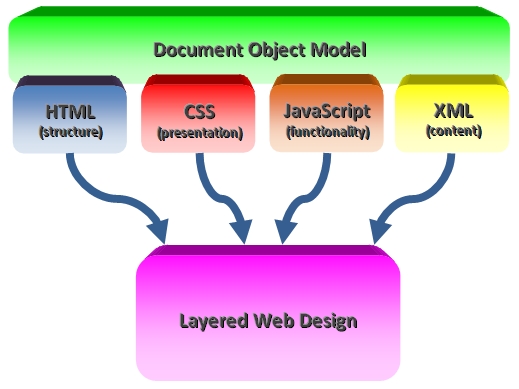
Layered web design is also referred to as progressive enhancement.
The components work together like this:
- Page structure is specified in HTML.
- CSS is used to control presentation.
- XML files can be used to provide the content for web pages.
- JavaScript provides functionality and can be used to read the data from the XML file (or JSON or a database) and build the resulting page.
- The Document Object Model (DOM) underlies all of the above and dictates how to access and control individual elements that make up an HTML document.
What is Progressive Enhancement, and why it matters discusses some of the benefits of progressive enhancement.
The first part of this course focuses on how to build a static web page using HTML5, and how to control its appearance using CSS.
- My web design analogy presents an explanation that may make more sense.
- The first segment of this course will teach you how to use JavaScript to generate interactive web sites, and how to make use of the DOM and XML.
- Later courses will investigate alternatives to JavaScript and XML, as full scale eCommerce sites are developed.
- Here is a cool news story about one of our advanced courses.
Section 2: Basic Page Structure
HTML is written in the form of labels (known as tags), surrounded by angle brackets (< and >).
- Tags tell web browsers such as Chrome and Firefox how to display the web page.
Your basic HTML document is little more than a text document that contains markup tags with a .html or .htm file extension (rather than .txt).
Let's create a simple HTML document in Notepad using the following code:
<!DOCTYPE html>
<html lang="en">
<head>
<title>Spiffy Page</title>
</head>
<body>
<h1>My First Page</h1>
<p>Check out my spiffy page!</p>
</body>
</html>
Here's how:
- Highlight the text above and copy it to your clipboard by pressing the Ctrl key and the C key at the same time.
-
Start Notepad (or some other text editor).
- On my Windows machine I click the Search icon, then start typing "Notepad" in the search area, and when Notepad popps up as an option I click it.
- Paste the code from the clipboard into Notepad by pressing the Ctrl key and the V key at the same time.
- Select "File" from the menu, then click "Save As...".
- In the resulting "Save As" window:
- Choose a folder in which to save your new html program (Desktop is always easy to find).
- Change the value in the "Save as type:" drop down box to "All Files (*.*)".
- Specify a file name in the "File name:" text field like "test.html" or "test.htm".
- You've just created your first web page! Open your choice of web browsers and open the file you just created by pressing Ctrl-O.
- Navigate to where you saved the file, and open it.
- If all went well, you'll be staring at your first web page.
- Pat self on back!
Structure
So what's all that stuff that you just copied? Here's a breakdown of what the code represents:
<!DOCTYPE html>
The doctype tells browsers and validators the html specification to which the html code conforms.
- <!DOCTYPE html> is for HTML5.
- Earlier doctypes were considerably more complex (HTML Doctypes examples).
- In HTML5 the formal syntax is defined in upper case letters, although both lower case and mixes of lower case upper case are also treated as valid.
<html lang="en">
The html opening and closing tags indicate the beginning and end of the HTML document (respectively).
- The html element is also known as the root element.
- The validator now requires that you add the attribute lang="en". View Page Source for this page for an example.
- A document can contain only one pair of <html> tags.
- Within the document, there are two parts: the "head" and the "body".
<head>
The head opening and closing tags mark the beginning and end of the document header.
-
The head section is like the cover page of the document.
- Just as the cover page of a book contains information about the book (such as the title), the head section contains information about the document.
-
Only a few tags are legal inside the head element, including the
<base>, <link>, <meta>, <title>, <style>, and <script> tags.
- If you put an HTML tag like <h1> or <p> inside a head element, most browsers will display it, even though it is illegal.
- The head element must include a title for the document, and can include scripts, styles, meta information, and more.
- Information in the document header is not displayed on the page itself.
- A document can contain only one pair of <head> tags.
<title>
<title> states the title of the document.
- A <title> tag is the main text that describes an online document.
- The text inside the <title> tags is not displayed in the document.
- Title tags show up in both a browser's title bar and in applicable tabs.
- A title tag provides a title for the page when it is added to favorites or bookmarks.
- A title tag displays a title for the page in search-engine results.
- A title tag is the single most important on-page SEO element.
Meta Tags
Meta tags are used to provide data about the web page that will not be seen by the web surfer unless they view your web site's HTML.
- The <meta> tag always goes inside the <head> element.
- Meta tags provide metadata (which is information about data) that can be used by browsers (how to display content or reload the page), search engines (keywords), or other web services.
- In the past, meta tags were a primary way for your site to be recognized by web spiders, but the internet community abused the meta tags to artificially increase their ranking in the search engine databases.
-
Some recommendations urge use of the description and keywords tags for SEO,
while others include Content Type and Content Language. Here is an example:
<meta charset="utf-8">
- Meta Tags Explained has a good discussion of tags.
- Right click on this page and then select View Page Source to see an example of meta tags.
<body>
The <body> tags delineate the section that holds everything that is actually displayed.
- All the headings, paragraphs, images, lists, tables, etc., are in the body section.
- A document can contain only one pair of <body> tags.
More to come
The above example also includes the <h1> and <p> tags, which will be discussed in the upcoming "Page Contents" section.
- <h1></h1> – text between these tags will be displayed using a large font by the browser
- <p></p> – text between these tags will be displayed as a paragraph by the browser
Section 3: Page Contents
The content of your HTML page resides within the <body> tag.
- This includes all the text and other content (links, pictures, and so on).
- This section will discuss headings, paragraphs, line breaks, images, horizontal rules, and comments.
Headings
Headings add section titles to a page.
HTML defines six levels of headings.
-
Headings are defined with the <h1> to <h6> tags,
with <h1> being the largest and <h6> being the smallest.
<h1>This is a top-level heading.</h1>
<h2>This is a second-level heading.</h2>
<h3>This is a third-level heading.</h3>
<h4>This is a fourth-level heading.</h4>
<h5>This is a fifth-level heading.</h5>
<h6>This is a sixth-level heading.</h6>
Here is what is displayed by the above code (using default formatting):
Think of headings as items in an outline.
- If the text you write is structured, use the headings to express that structure.
Headings 4 through 6 aren’t visually interesting, but they do have meaning in terms of the document’s structure.
- If a document requires more than three levels of headings you can use use CSS to make headings 4 through 6 appear as you intend.
Notes about Headings
- For search engine optimization (SEO) you should include only one <h1> in your document.
- An <h1> is twice the size of your base font (2 em) and bold.
- An <h2> is one and a half the size of your base font (1.5 em) and bold.
- An <h3> is 1.17 times the size of your base font (1.17 em) and bold.
- An <h4> is the same size as your base font (1 em) and bold.
- An <h5> is .83 times the size of your base font (.83 em) and bold.
- An <h6> is .75 times the size of your base font (.75 em) and bold.
SEO and Headings
In her (now vanished from the web) article titled Why Do Search Engines Like H1 Tags, professional web developer and author Jennifer Kyrnin explained
-
If you think of a Web page as an outline, the <h1>, <h2>, etc. heading tags serve to divide the
page into sections.
- Your most important headline is your <h1> headline, because it should be used to indicate the topic for the entire web page.
- Search engines consider content in the <h1> tag to be most important and give it a higher rank than other content on the page.
-
When you structure your pages logically with one <h1> tag, one or two <h2> tags, and one
or two <h3> tags beneath the <h2> tags, you create a page that is structured and easy to
follow.
- Search engine robots try to index pages with the keywords that the pages are about, and pages that are structured to make it obvious what they are about (and the keyword phrases associated with them) will rank better than those that are not.
-
The <h1> is the most important tag and it should never be skipped on a page.
- Search spiders pay attention to the words used in the <h1> tag as it should contain a basic description of the page content, just as the page <title> does.
- Some sites claim that the header tags from <h1> to <h6> form a hierarchy, so if you skip any of the tag numbers (e.g,. jumping from 1 to 3) the heading structure will be broken, which is not ideal for on-page SEO. At the very least, skipping heading levels can create screen reading software, which scans from heading to heading to quickly determine the content of the page.
- The new structure tags in HTML5 may alter some recommendations about heading. See Headings and why you should use them
Paragraphs
Ordinary paragraphs can be added to a page using the <p> tag.
When browsers read a paragraph tag they automatically add an extra blank line before and after a paragraph.
Incidentally, this line, as well as the two above it, are paragraphs. Like paragraphs in an essay, they can be made up of multiple lines.
Here is an example:
<p>Actually, all education is self-education. A teacher is only a guide, to point out the way, and no school, no matter how excellent, can give you education. What you receive is like the outlines in a child’s coloring book. You must fill in the colors yourself.</p>
This is what the code above produces (using default formatting):
Line Breaks
The <br> tag is used when you want to end a line, but don't want to start a new paragraph.
- The <br> tag breaks a line of text at the point where it appears.
- When a web browser encounters a <br> tag, it restarts the text after the tag at the left margin (whatever the current left margin happens to be for the current element).
- You can use <br> within other elements, such as
paragraphs or list items;
won’t add extra space above or below the new line or change the font or style of the current entity. - In HTML, the <br> tag is an empty tag, meaning it has no content and no closing tag.
The following example shows a simple paragraph in which each line ends with a <br> (except for the last, which ends with a closing </p> tag):
<p>Life’s but a walking shadow; a poor player,<br> That struts and frets his hour upon the stage,<br>And then is heard no more: it is a tale <br> Told by an idiot, full of sound and fury,<br> Signifying nothing.</p>
This is what the text above looks like using default formatting when viewed in a browser:
Horizontal Rule (Solid Line)
The <hr> tag is used when you want to insert a horizontal line in an HTML page.
- Rule lines are used to visually separate sections of a web page – just before headings, for example – or to separate body text from a list of items.
- An example of a horizontal rule appears at the top and bottom of each section of notes.
- You can set the color, width, alignment, shading, thickness (size), etc. of the line using CSS, as in the example below.
Simple Lists
The web pages you create with HTML5 often contain data organized into lists, which can stand alone or be nested within each other.
There are various types of lists in HTML5, but for now we'll limit ourselves to simple ordered and unordered lists.
Here is an example of each.
Ordered list
- First item.
- Second item.
- Third item.
Unordered list
- First item.
- Second item.
- Third item.
Ordered and Unordered Lists
- An ordered list uses the <ol> tag and the unordered list uses the <ul> tag.
- Both of these types of lists use <li> to indicate a list item.
- List items can contain paragraphs, line breaks, images, links, and other lists (referred to as a nested list).
-
Refer to the following code:
<ol>
<li>Milk</li>
<li>Eggs</li>
<li>Bread</li>
</ol>
<ul>
<li>Milk</li>
<li>Eggs</li>
<li>Bread</li>
</ul> -
Now note the difference in what the code produces:
- Milk
- Eggs
- Bread
- Milk
- Eggs
- Bread
Links
To create a link in an HTML page, you use the <a> tag.
- It is called the anchor tag because it used to be used to create anchors for links.
- The correct use of the <a> tag, however, is to create links to other pages.
- A link can point to any resource on the Internet: an HTML page, an image, a sound, a video, an email address, a PDF file, etc.
Syntax
You create a link with the following syntax:
<a href="http://www.isu.edu">Idaho State University</a>
The href attribute is used to specify the URL of the document to which to link, and the words between the open and close of the anchor tag will be displayed as a link.
The example code above results in the following link:
More coverage of link syntax can be found in the Hyperlinks notes.
SEO and Anchor Text
Anchor text is the visible, clickable text in a hyperlink.
- The quality of your anchor text will play a huge factor in ranking your pages for specific keywords, especially competitive ones.
Search engines use anchor text to help determine the subject matter of the linked-to document.
-
Google's SEO Starter Kit recommends that you choose descriptive text.
-
The anchor text you use for a link should provide at least a basic idea of what the page linked to is about.
- Avoid writing generic anchor text like "page", "article", or "click here".
- Avoid using text that is off-topic or has no relation to the content of the page linked to.
- Avoid using the page's URL as the anchor text.
-
The anchor text you use for a link should provide at least a basic idea of what the page linked to is about.
List of Links
You can create lists of links using anchor tags in list items:
<ul>
<li><a href="http://www.isu.edu/">Idaho State University</a></li>
<li><a href="http://isu.edu/cob/">ISU College of Business</a></li>
<li><a href="https://www.isu.edu/business-informatics/">Informatics @ ISU</a></li>
</ul>
The example code above results in the following list of links:
Section 4: Grouping Tags
This section will discuss the legacy grouping tags (<div> and <span>) and the new section tags (<header>, <section>, <article>, <nav>, <aside>, and <footer>).
<div> tag
A <div> tag is used to define a generic container or division within the content of an an HTML document.
-
The div element is a
block-level element.
- Block-level means that they typically are formatted with a line break before and after the element (thereby creating a stand-alone block of content).
- The distinction of block-level vs. inline elements is used in HTML specifications up to 4.01, but in HTML5, this binary distinction is replaced with a more complex set of content categories.
- Generally, block-level elements may contain inline elements and other block-level elements, which means the div element can contain nearly any other tag.
- The div element is not meant to represent anything semantically.
-
The <div> tag is often used to group block-elements to format them
by using CSS styles.
- By associating an id with a <div> tag interesting interactive effects can be accomplished.
- For example, a <div> tag could be used to designate that a section consisting of five paragraphs might have some particular style.
- In HTML 4, a div element could not be inside another block-level element, like a p element, but in HTML5 the div element can be found inside and can contain other flow content elements, like p and div.
Click the plus sign to see a <div> tag in action:

<span> tag
The span element is an inline container for pieces of text, used for grouping and applying styles to inline elements.
- By itself, the <span> tag has no presentational or semantic meaning, but acquires its potential when used together with Style Sheets.
- The difference between <span> and <div> is that a span element is in-line and usually used for a small chunk of in-line HTML whereas a div element is block and used to group larger chunks of code.
- You can use the <span> tag when you want to change the format of a single word.
- The <span> tag is a very powerful tool for web developers because it is so open-ended.
- Here are some examples of <span> tags in action. Wow! And Zoom!
Section 5: Comments
The comment tag is used to insert a comment in the HTML source code.
- The sequence "<!--" opens the comment, and the sequence "-->" closes it.
- Note that you need an exclamation point after the opening bracket, but not before the closing bracket.
- Text in comments is ignored when the HTML file is parsed; comments don’t ever show up onscreen.
- Users can view your comments using the View Source functionality in their browsers, so don't put anything in comments that you don't want them to see.
Justification for Comments
As HTML has evolved toward "semantic" HTML, in which tags actually provide context or meaning, HTML comments may seem less critical than in the past.
It is a good practice to add comments into your HTML code, especially in complex documents, to indicate sections of a document, and any other notes to anyone looking at the code. Comments help you and others understand your code and increases code readability.
Commenting in HTML allows developers to leave notes about their code, its functionality or to indicate necessary changes for the future.
-
You can use comments to explain your code, which can
help you when you edit the source code at a later date.
<!-- Rewrite this section. -->
-
You can also comment tags to "comment out" sections
of page code if they aren't ready to be displayed yet or if they have errors.
<!--
This section needs to be verified before including it.
<p>All paragraphs must be in a red font!</p>
--> -
You can also comment blocks to explain the purpose of specific sections.
<!-- - - - - - - - - - - - - - - - - - - - - - - - - - - - - - - -->
– or –
<!-- This section of notes was written by -->
<!-- Chris Joslin in partial fulfillment of -->
<!-- requirements for CIS 4430 ind. study. -->
<!-- - - - - - - - - - - - - - - - - - - - - - - - - - - - - - - --><!-- - - - - - - - - - - - - - - - - - - - - - - - - - - - - - -
This section of notes was written by
Chris Joslin in partial fulfillment of
requirements for CIS 4430 ind. study.
- - - - - - - - - - - - - - - - - - - - - - - - - - - - - - - -->
The page How Good Are Your HTML and CSS Comments? provides great explanations of why you should include comments.
Caution
-
A common error often flagged by validators is including a string of hyphens ("<!-------->" or
"<!-- ---- -->") within a comment.
- Authors should avoid putting two or more adjacent hyphens inside comments.
-
If you want a line to mark the beginning and end of a comment
block, use something like
<!-- - - - - - - - - - - - - - - - - - - -->
...or use the tilde (~):<!-- ~~~~~~~~~~~~~~~~~~ -->
- If you open a comment, close it before opening another.
Be careful when inserting comments before the !DOCTYPE line. It seems to be accepted now, but it used to make the validator angry!
Section 6: Validation
There are several good reasons to validate HTML documents
- The most important reason for validating a document is interoperability between browsers.
- It also ensures that your page doesn't contain any errors, which helps enhance search engine visibility.
- An error free page also reflects well on your skill as a web developer.
- You can find more reasons to validate in hte W3C's Why Validate? and Why Validate Your Pages?.
-
Here is a link to
the W3C validator.
- It allows you to validate your document by inputting the document URL, uploading the document, or by direct input of code.
-
An HTML document is validated against the DOCTYPE that we discussed
earlier.
- When you specify <!DOCTYPE html> in a page, you are also providing information to the validator to check your code using the HTML5 specifications.
Section 7: Let's Play
Click the "Edit and Click Me >>" to see the results of the html code in the left panel in the panel on the right.
Then, play around with the html code, making changes and seeing the effect of those changes in the right panel.