


Section 1: Overview
Sometimes it is handy to have different areas of an image act as hyperlinks.
- These image maps are graphic images designed in a way that allow various hotspots to be clickable by users.
-
Here are some examples of image maps:
- Business Informatics Course Flow uses hotspots as links to allow the display of course descriptions.
- INFO 4407 Concept Map uses hotspots as links to display the next tier of the course map.
- A sample current system logical DFD for a Real Estate Management system is also an image map with links to lower level diagrams.
An image map is an overlay for a graphic that assigns hyperlinks to specifically defined areas (hotspots) on the image.
Hence, you begin by specifying the image, but you must include a usemap attribute.
- The usemap attribute is associated with a <map> element's name attribute, and creates a relationship between the <img> and the <map>.
The <map> tag is next used to define a client-side image map.
- The required name attribute of the <map> element is associated with the <img>'s usemap attribute and creates a relationship between the image and the map.
- The <map> element contains a number of <area> elements that define the clickable areas in the image map.
Here is the image map code for the Level 0 DFD:
-
<img usemap="#level0" src="D0.jpg" alt="Real Estate System Level 0" />
<map name="#level0">
<!-- Hotspot #1 -->
<area coords="434,134,594,262" href="L1D1.htm" shape="rect" />
<!-- Hotspot #2 -->
<area coords="404,402,564,530" href="L1D2.htm" shape="rect" />
<!-- Hotspot #3 -->
<area coords="421,808,581,936" href="L1D3.htm" shape="rect" />
</map>
Section 2: Process
To create an image map for your DFD diagram, you first must have an image of your DFD. You can capture an image of each level of the DFD using a tool like the Windows Snipping Tool.
The easiest way to determine the coordinates of various points is to use an online tool like Image-Maps.com.
- You first upload your image by clicking "Browse for File", selecting your image file, and then clicking "Start Mapping".
- Next click "Click to Continue" to bring up your image.
- Position your cursor at the upper left corner of the first process on your image, right click to bring up the menu, and click "Create Rect".
- Move the popup menu out of your way, click the lower right handle of the small white rectangle, and drag it to the lower right corner of the process for which you are creating a hotspot, release the mouse button, and click Save on the popup menu.
- Position the cursor at the top left corner of the next process, right click, and proceed as above. Continue until you have designated all of your hotspots.
- When you are done, right click anywhere on the page to pull up the menu and click "Get Code".
- Click the second tab ("HTML Code") on the resulting screen and scroll to the bottom to find your HTML code. The code contains your hotspot coordinates. Copy all of the code or the lines with the area tags. You will probably need to alter the code a bit to strip their extraneous additions, such as the final area tag.
- Your final HTML code should resemble the code above (comments are optional).
Section 3: Hotspot Shapes
Hotspots can be rectangular, circular, or irregularly shaped (called a poly hotspot).
The position of a rectangular hotspot is defined by two points: its upper-left and lower-right corners.
- Each point is expressed as a pair of numbers that represent the horizontal and vertical distance (in pixels) from the upper-left corner of the image.
- For example, in the following image, the first process is defined as a hotspot.
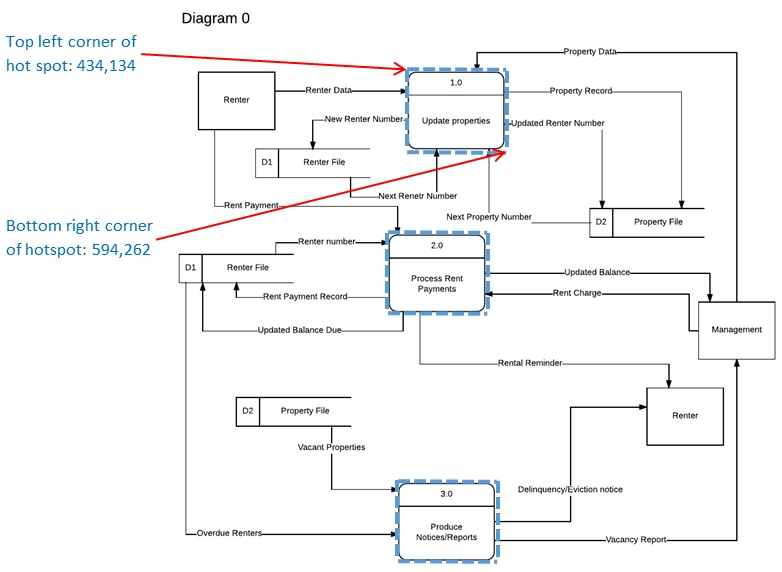
- The upper-left corner of the process is located at (434, 134) — in other words, 434 pixels to the right and 134 pixels down from the upper-left corner of the image.
- The lower-right corner of the process is at (594, 262).
-
Therefore, the code for defining this particular hotspot is as follows:
<area shape="rect" coords="434,134, 594,262" href="enter.htm">
While you probably will have no need of circular and poly hotspots in the projects, they will be explained for completeness.
- To define a circular hotspot, you use three coordinates: two for the circle's center point (horizontal and vertical values), and one for the radius of the circle:
- <area shape="circle" coords="270,364,144" href="index.htm">
-
To define a poly hotspot, you use as many coordinates as are needed to define all the
vertexes of the shape.
- Poly hotspots consist of straight lines that connect each of the points you define.
- For example, here’s one with four vertices:
- <area shape="poly" coords="287,71, 413,286, 314,446, 188,267" href="index.htm">
Section 4: More HTML Details
To construct an image map, start with opening and closing <map> tags.
- In the opening tag, place name and id attributes.
-
The name and id can be the same; you need the name for the map itself, and you
can use the id to refer to the image map in the style sheet, if desired.
<map name="moth" id="moth">
</map> -
Then within the <map> tag, insert the points for the areas:
<map name="moth" id="moth">
<area shape="poly" coords="287,71, 413,286, 314,446, 188,267" href="index.htm">
</map> - Just as with hyperlinks, you can include a title attribute in an <area> tag to make a tooltip appear when a user hovers the mouse over it.
-
Finally, reference the map's name in the <img> tag for the image with
the usemap attribute.
-
You must include a pound or hash sign (#) before the map name, as shown
in the following:
<img src="moth.jpg" usemap="#moth" style="border:none">
-
You must include a pound or hash sign (#) before the map name, as shown
in the following: