


Section 1: Overview
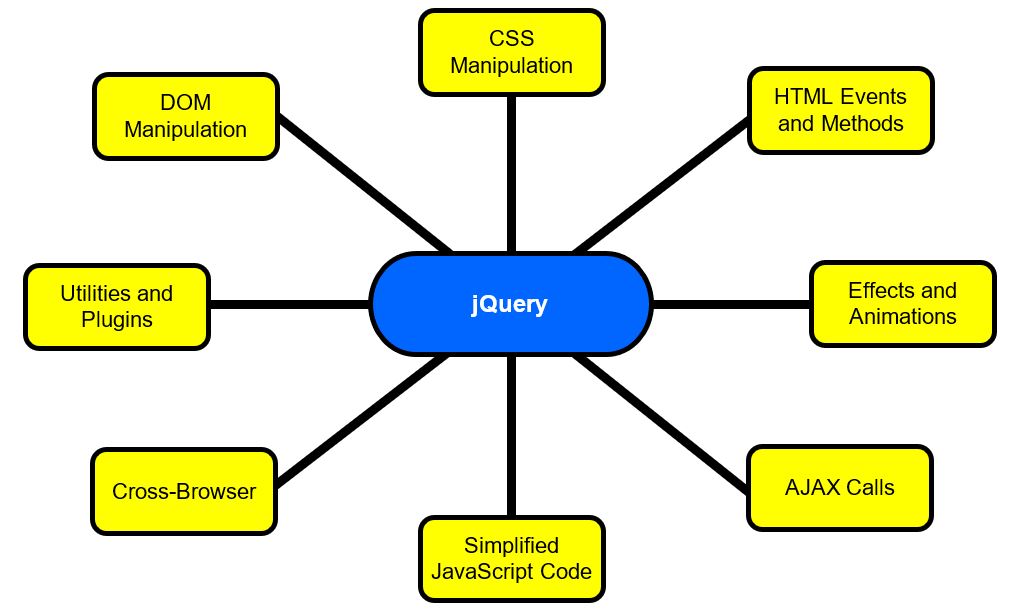
JQuery is a free, open-source JavaScript library that makes HTML event handling, document traversing, interaction handling, animation, and Ajax more simple, fast, and efficient.
- It is both feature-rich and cross-platform.
- It is designed for a specific purpose, which is to facilitate HTML client-side scripting.
- jQuery’s syntax makes the creation of HTML elements, animation, and event listeners much easier.
- It is fast, light-weight, and compatible with different types of web browsers.
- It allows developers to easily use JavaScript on web pages to make them user-friendly and interactive, but with less coding.
jQuery was originally developed to take common, repetitive tasks, strip out all the unnecessary markup, and leave them short, smart and understandable.
- In short, jQuery was introduced to make development with JavaScript easier.
- For more, see History break: How did John build jQuery?
A fast, small, and feature-rich JavaScript library. It makes things like HTML document traversal and manipulation, event handling, animation, and Ajax much simpler with an easy-to-use API that works across a multitude of browsers. With a combination of versatility and extensibility, jQuery has changed the way that millions of people write JavaScript. http://jquery.com/
jQuery is a JavaScript library designed to simplify HTML DOM tree traversal and manipulation, as well as event handling, CSS animation, and Ajax. It is free, open-source software using the permissive MIT License. As of May 2019, jQuery is used by 73% of the 10 million most popular websites. Web analysis indicates that it is the most widely deployed JavaScript library by a large margin, having at least 3 to 4 times more usage than any other JavaScript library. https://en.wikipedia.org/wiki/JQuery
A lightweight, "write less, do more", JavaScript library. The purpose of jQuery is to make it much easier to use JavaScript on your website. jQuery takes a lot of common tasks that require many lines of JavaScript code to accomplish, and wraps them into methods that you can call with a single line of code. jQuery also simplifies a lot of the complicated things from JavaScript, like AJAX calls and DOM manipulation. https://www.w3schools.com/jquery/jquery_intro.asp
Justification:
jQuery allows for the following:
jQuery helps to implement UI-related critical functionality without writing hundreds of lines of code.
jQuery is JavaScript and you can write code mixing both syntaxes (provided that the jQuery library is loaded).
- jQuery is actually a library that simplifies the syntax needed to write some JavaScript functions, especially when it comes to DOM traversing: that’s why this library has grown so popular among front-end developers, particularly among those who don’t have a traditional programming background.
Section 2: Background
jQuery is ...
- ...a library
- ...open source
- ...free
jQuery must be included in (or linked to) your website.
jQuery is written in JavaScript.
Section 3: How to Use jQuery
Step 1: Download jQuery
Go to jQuery.com/download/
- Get the latest version, typically the jQuery Core x.x.x - minified (e.g., jquery-3.6.0.min.js)
Save it to your scripts folder.
Decent video on linking to jQuery.
"This allows browsers to ensure that resources hosted on third-party servers have not been tampered with. Use of SRI is recommended as a best-practice, whenever libraries are loaded from a third-party source."
The following script is recommended for your link:
<script src="https://code.jquery.com/jquery-3.6.0.min.js"
integrity="sha256-/xUj+3OJU5yExlq6GSYGSHk7tPXikynS7ogEvDej/m4="
crossorigin="anonymous">
</script>
Step 2: Link it to your page
The jQuery library is a single JavaScript file, and you reference it with the HTML <script> tag.
Add it just like you would add any other JavaScript file, typically before the statements linking to your JavaScript files.
<!DOCTYPE html>
<html>
<head>
<title>Test Page</title>
<meta charset="utf-8" />
<script src="https://code.jquery.com/jquery-3.6.0.min.js"
integrity="sha256-/xUj+3OJU5yExlq6GSYGSHk7tPXikynS7ogEvDej/m4="
crossorigin="anonymous">
</script>
</head>
<body>
</body>
</html>
Step 3: Create a separate JS file for jQuery statements
Add a second JS file to write your own code in.
Files are loaded in order, so you need to do the jQuery Library first.
<!DOCTYPE html>
<html>
<head>
<title>Test Page</title>
<meta charset="utf-8" />
<script src="https://code.jquery.com/jquery-3.6.0.min.js"
integrity="sha256-/xUj+3OJU5yExlq6GSYGSHk7tPXikynS7ogEvDej/m4="
crossorigin="anonymous">
</script>
<script src="myScript.js"></script>
</head>
<body>
<a href="">My Link</a>
</body>
</html>
Step 4: document ready
To be sure jQuery will run correctly include
$(document).ready(function() {
});
More details on the document ready event will be provided in the "Running Code on Page Load" section.
Here is a good beginning tutorial.
Section 4: jQuery Statements
Calling the jQuery object
You can call the jQuery object using the jQuery() function:
jQuery // ← this calls jQuery
You can also call the jQuery object using the dollar sign ($):
$ // ← this also calls jQuery
The $ sign is nothing but an identifier of jQuery() function.
Further discussion available at What does dollar sign ($) means in jQuery ?.
Video: jQuery Statements and the $ Sign
The $ (dollar sign) is used to indicate that the following code is going to be jQuery. This helps distinguish between jQuery and regular JavaScript.
Syntax
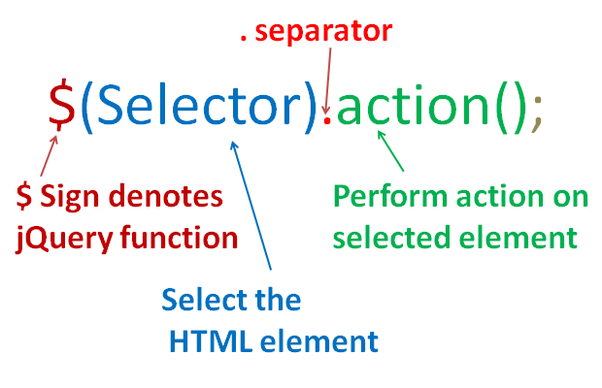
$(selector).action([options]);
- $ calls jQuery object
-
Selector is CSS based
- Used to find or query the HTML DOM Elements
-
Action is what is to be done on elements found.
- These are methods
- Options are optional variables related to the action to be done.
Sample code
<script>
$(document).ready(function(){
$("button").click(function(){
$("p").hide();
});
});
</script>
Link to demo code.
Section 5: Running Code on Page Load
Each of the following does the same thing.
The document ready event (or the alternatives below) prevents any jQuery code from running before the document is finished loading.
- It is good practice to wait for the document to be fully loaded and ready before working with it.
- This also allows you to have your JavaScript code before the body of your document, in the head section.
$(document).ready(function () {
// runs when document has loaded
});
function () {
// runs when document has loaded
};
window.onload = function () {
// runs when document has loaded
};
$(window).on("load", function () {
// runs when document has loaded
});
The link How jQuery Works explains this in more detail and the difference in the approaches.
Note that if you fail to enclose your functions in a version of the document ready event tags, you may need to put the link to your script file at the very bottom of the body element, just before the </body> closing tag.
Section 6: jQuery Selector
Selectors are CSS based.
Use the same rules that you would use in CSS.
$(this); // gets current element
$("span"); // gets all spans
$(".error"); // gets all elements with error class
$("#divOne"); // gets div with id of divOne
Can be simple or complex
$("li span"); // gets spans in a li
$("div, p"); // gets all ps and divs
$("div.selected p"); // gets ps in div with selected class
More jQuery Selectors
Selectors that include [ ] specify attributes.
$("input[checked]"); // gets all of checked input elements
$("input[type='text']"); // gets all textboxes
Pseudo classes
$("input:text"); // get all textboxes
$("tr:odd"); // gets odd table rows
$("div.error:first"); // gets the first div with error class
See also http://learn.jquery.com/using-jquery-core/selecting-elements/
Section 7: Common Methods
- .hide – Hides elements
- .show – Shows hidden elements
- .text – Gets/sets text in an element
- .html – Gets/sets html content in an element
- .val() – Gets/sets the value of a form element
- .addClass – Adds a CSS class to an element
- .removeClass – Removes a CSS class from an element
- .attr – Gets/sets attributes in an element
- .removeAttr – Removes an attribute from an element
Section 8: Setting Events, Adding Content, Removing Content
jQuery can be used to respond to events in an HTML page, add new HTML elements/content, and remove HTML elements and content.
Events
jQuery can be used to set events.
Instead of this JavaScript code:
var btnOne = document.getElementById("btnOne");
btnOne.onclick = function () {
alert("button was clicked")
};
You could write this jQuery code:
// This does the same thing
$("#btnOne").click(function () {
alert("button was clicked.")
});
The jQuery code could also be written like this:
// This also does the same thing
document.getElementById("btnOne").addEventListener("click", function() {
alert("button was clicked.")
});
Note that all of these functions make use of function expressions involving anonymous functions.
- If you wish to explore this topic further, the video Function Declarations VS Function Expressions in JavaScript is worth watching.
Add New HTML Content
There are four jQuery methods to add new HTML content:
- append() – inserts content at the end of the selected elements (becomes part of the element)
- prepend() – inserts content at the beginning of the selected elements (becomes part of the element)
- after() – inserts content after the selected elements
- before() – inserts content before the selected elements
Example
HTML
<body>
<a href="">My Link</a>
</body>
myScript01.js
window.onload = function () {
$("a").prepend("[prepended]");
$("a").append("[appended]");
$("a").before("[before]");
$("a").after("[after]");
};
Result
<body>
[before]<a href="">[prepended]My Link[appended]</a>[after]
</body>
- In this example, the original text (which can be seen with View Page Source, is "My Link", but the script runs when the dpcument is ready and changes the appearance so what you see is "[before][prepended]My Link[appended][after]".
Here is a more enlightening example of using the append() function to add three newly created elements to an HTML page – one created using HTML, one created using jQuery, and one created using DOM.
$(function() {
var txt1 = "<p>Text1.</p>"; // Create element with HTML
var txt2 = $("<p></p>").text("Text2."); // Create with jQuery
var txt3 = document.createElement("p"); // Create with DOM
txt3.innerHTML = "Text3.";
$("body").append(txt1, txt2, txt3); // Append the new elements
});
<body>
</body>
Remove New HTML Content
To remove elements and content, there are mainly two jQuery methods:
- remove() – Removes the selected element (and its child elements)
- empty() – Removes the child elements from the selected element
Example 1 – Using remove() and an ID
Before
<body>
<div id="divOne">
<p>Good stuff!</p>
</div>
<div id="divTwo">
<p>Not so good stuff!</p>
</div>
</body>
Apply
$("#divTwo").remove();
Result
<body>
<div id="divOne">
<p>Good stuff!</p>
</div>
</body>
Example 2 – Using remove() and a Class
Before
<body>
<div id="divOne">
<p class="mark">One</p>
<p class="flag">Two</p>
</div>
</body>
Apply
$("p").remove(".mark");
Result
<body>
<div id="divOne">
<p class="flag">Two</p>
</div>
</body>
Example 3 – Using empty()
Before
<body>
<div id="divOne">
<p>One</p>
<p>Two</p>
</div>
</body>
Apply
$("#divOne").empty();
Result
<body>
<div id="divOne">
</div>
</body>
Section 9: Dimensions
jQuery provides several methods for working with the dimensions of elements and browser window:
- width() – sets or returns the width of an element (excludes padding, border and margin)
- height() – sets or returns the height of an element (excludes padding, border and margin)
- innerWidth() – returns the width of an element (includes padding)
- innerHeight() – returns the height of an element (includes padding)
- outerWidth() – returns the width of an element (includes padding and border)
- outerHeight() – returns the height of an element (includes padding and border)
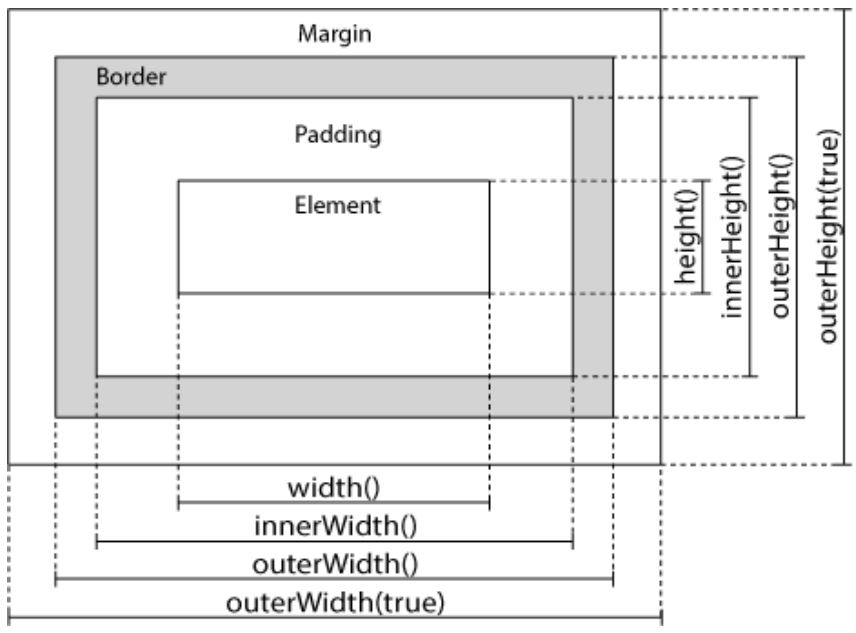
Note the similarities to the CSS box model.