


Section 1: Recap
While the Document Object Model was briefly introduced earlier, this section will focus on the jQuery features for accessing and manipulating DOM and the Browser Object Model (BOM) elements.
Section 2: Browser Object Model
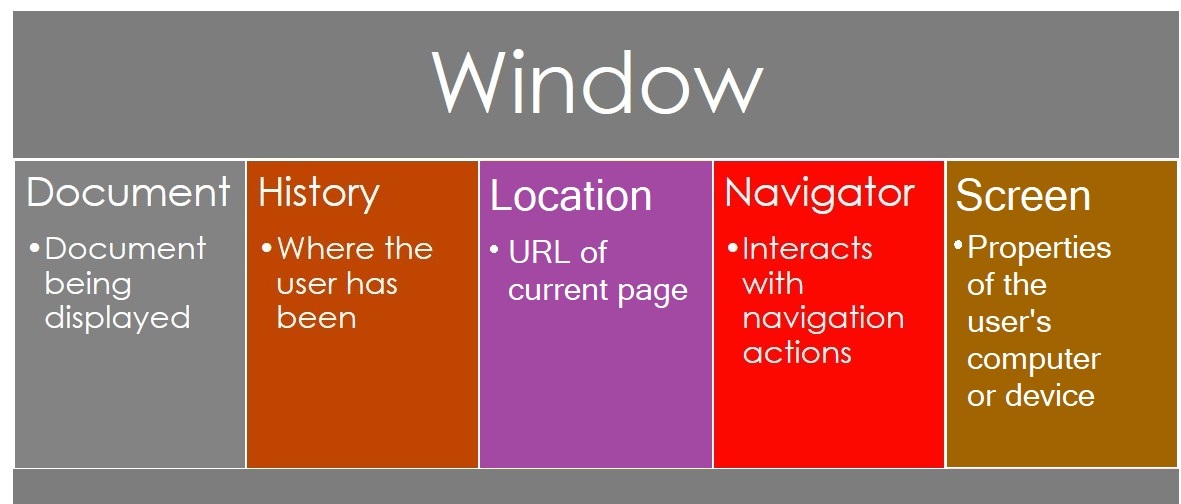
The Browser Object Model (BOM) is a larger representation of everything provided by the browser, including the current document, location, history, frames, and any other functionality the browser may expose to JavaScript.
- Browsers feature a BOM that allows access and manipulation of the browser window.
- Using the BOM, developers can move the window, change text in the status bar, and perform other actions that do not directly relate to the page content.
- The BOM is not standardized and can change based on different browsers.
- The BOM is the core of JavaScript on the web because it provides developers with objects that expose the web browser’s functionality.
-
Here is an example of Window data provided by the BOM.
Window object
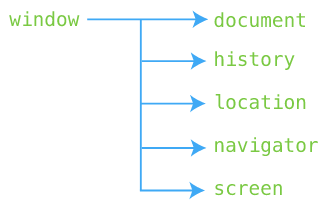
The BOM's root is the window object, which displays properties of the current open window or tab. It has several children, as seen below:
Section 1: Document
- Window – understand the
windowobject. - Alert – display an alert dialog.
- Confirm – display a modal dialog with a question.
- Prompt – prompt the user to input some text.
- setTimeout – set a timer and execute a callback function once the timer expires.
- setInterval – execute a callback function repeatedly with a fixed delay between each call.
Section 2: History
Section 3: Location
- Location – manipulate the location of a document via the
locationobject. - Get query string parameters – learn how to retrieve query string parameters.
- Redirect to a new URL – show you how to redirect to a new URL using JavaScript.
Section 4: Navigator
Section 5: Screen
- Screen – get the information about the screen on which the browser is running by using the
screenobject.
Window Properties
- window.document – Get the current document object
- window.history – Get the window browser history
For more details, visit The Window Object.
Window Methods
- window.onload() – Fires when the window finishes loading
- window.setInterval() – Call a function or evaluates an expression at specified intervals (in milliseconds)
- window.setTimeout() – Calls a function or evaluates an expression after a specified number of milliseconds
- window.print() – Prints what is in the window
- window.open() – Opens a new window
For more details, visit The Window Object.
Typically, the "window." portion can be omitted when using properties and methods.
Cross-browser Consistency
There are no official standards for the BOM, which means no guarantee of consistency.
- In the recent past, inconsitencies were much more problematic.
- However, modern browsers now implement (almost) the same methods and properties for JavaScript interactivity, so you may encounter references to "the methods and properties of the BOM".
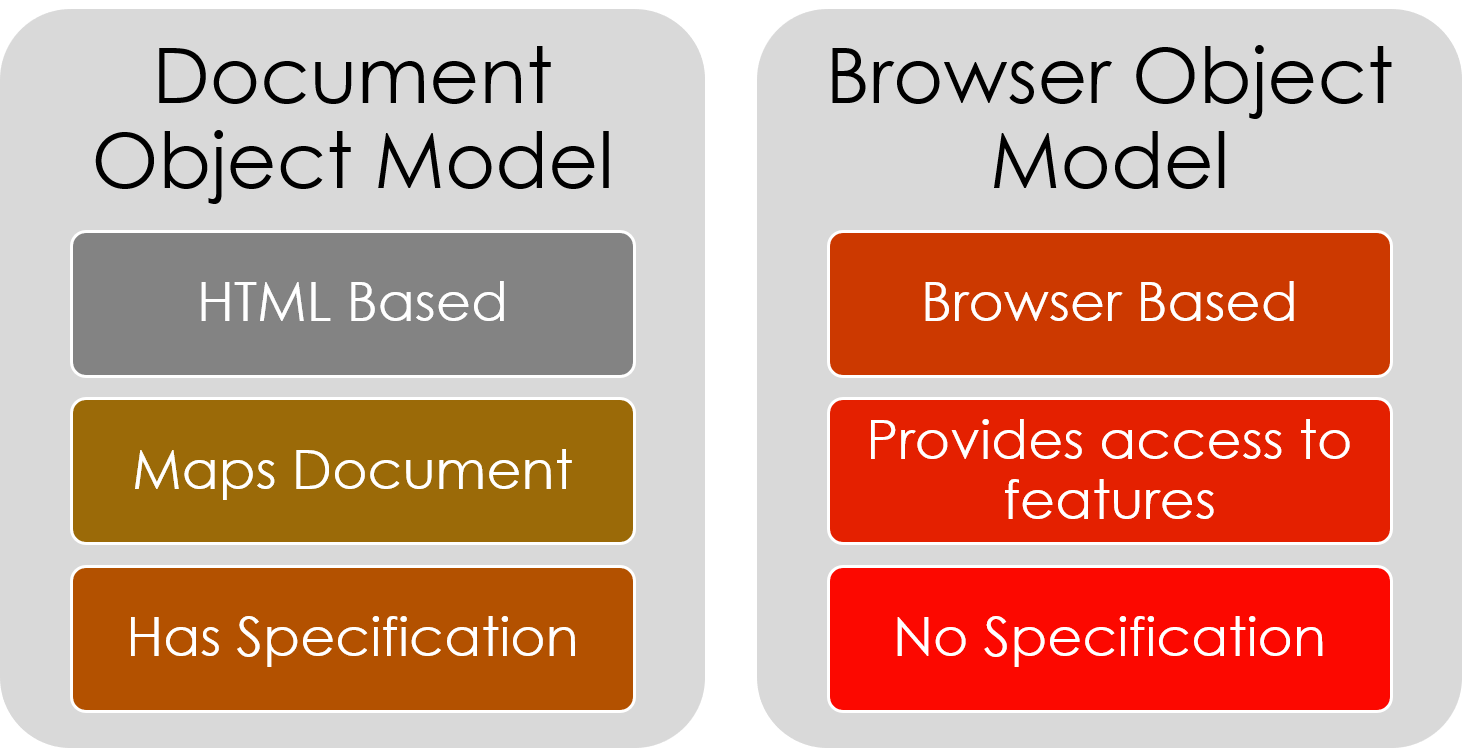
DOM vs. BOM
Section 3: DOM
"The Document Object Model is a platform- and language-neutral interface that will allow programs and scripts to dynamically access and update the content, structure, and style of documents."
- "The document can be further processed and the results of that processing can be incorporated back into the presented page." -W3C
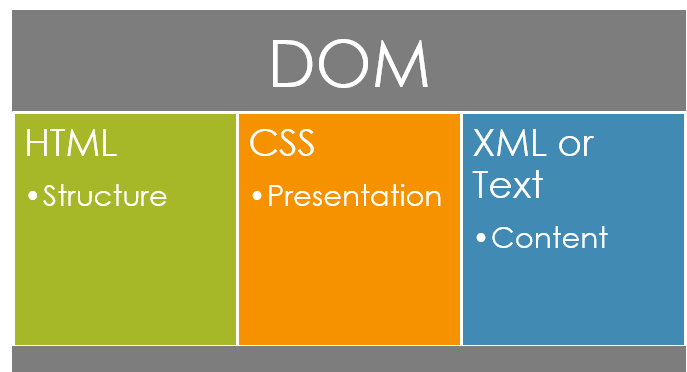
The DOM is a tree
DOM provides a hierarchical structure of everything on your web page, based on the HTML hierarchy defined by the page.
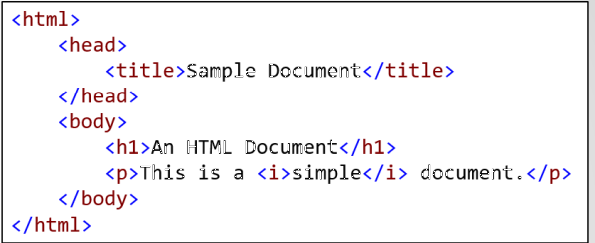
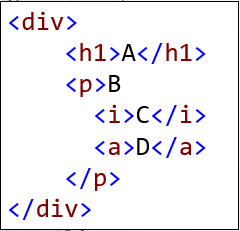
Given the following code:
The DOM tree may be envisioned as in the figure below:
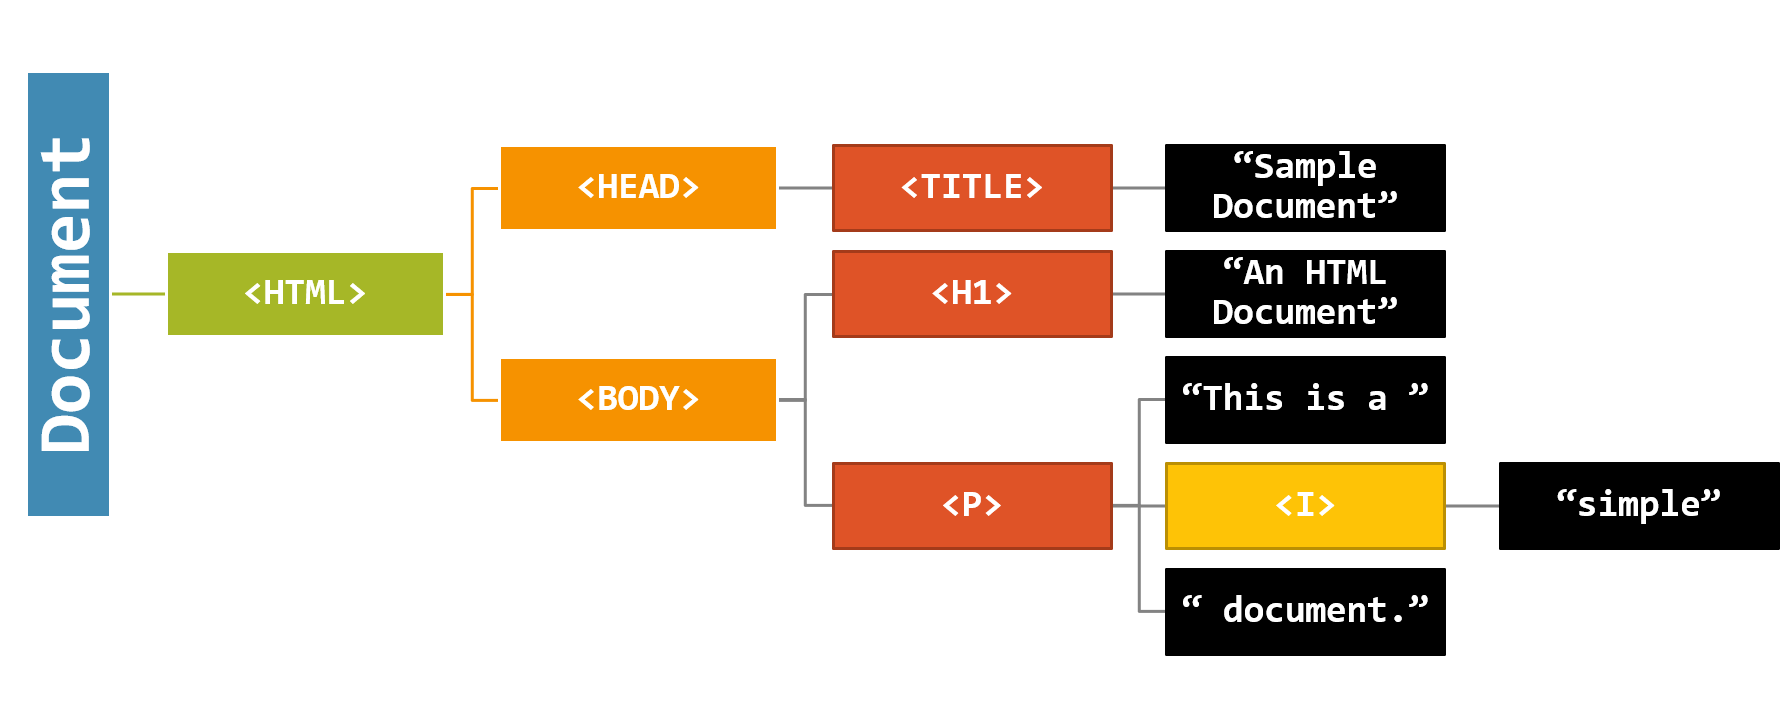
A primitive live DOM viewer can be found at Hixie DOM Viewer.
Section 4: Node Relationships
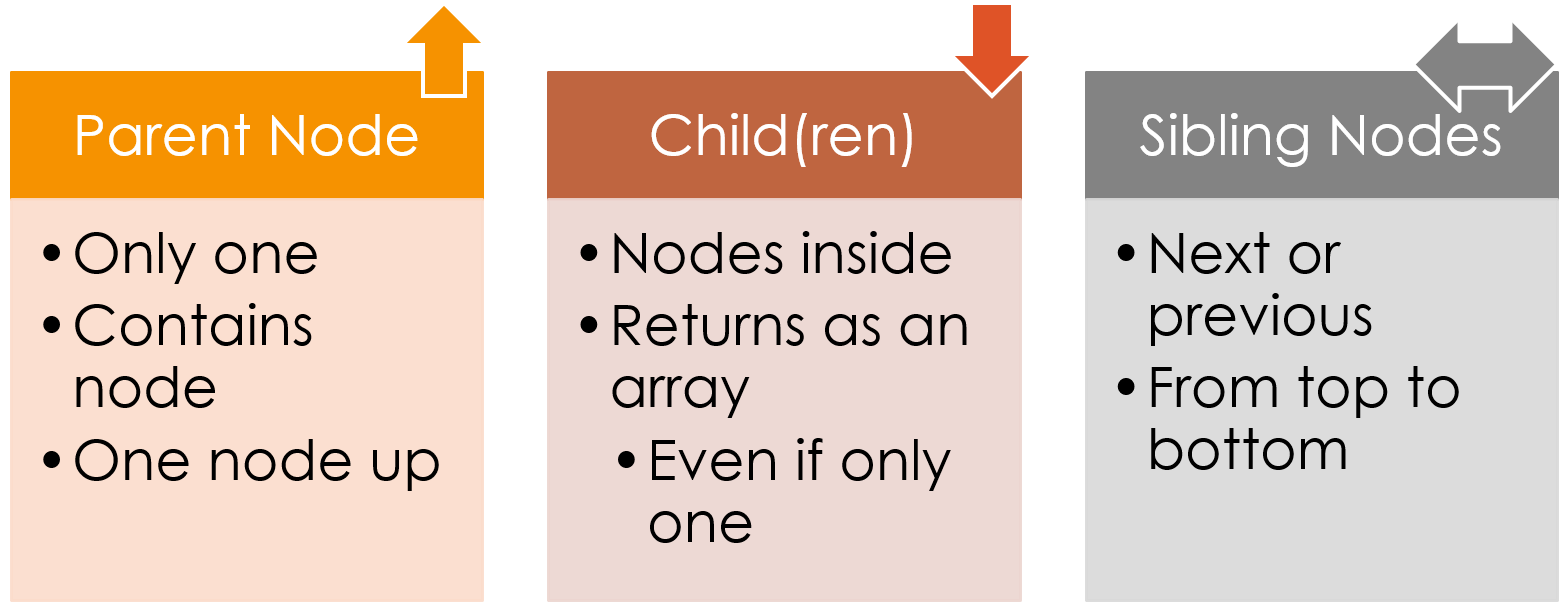
Relationships
- A parent is an element that is directly above and connected to an element in the document tree.
- A child is an element that is directly below and connected to an element in the document tree.
- Sibling elements are elements that share the same parent.
These terms, along with ancestors and descendants, are explained in http://web.simmons.edu/~grabiner/comm244/weekfour/document-tree.html.
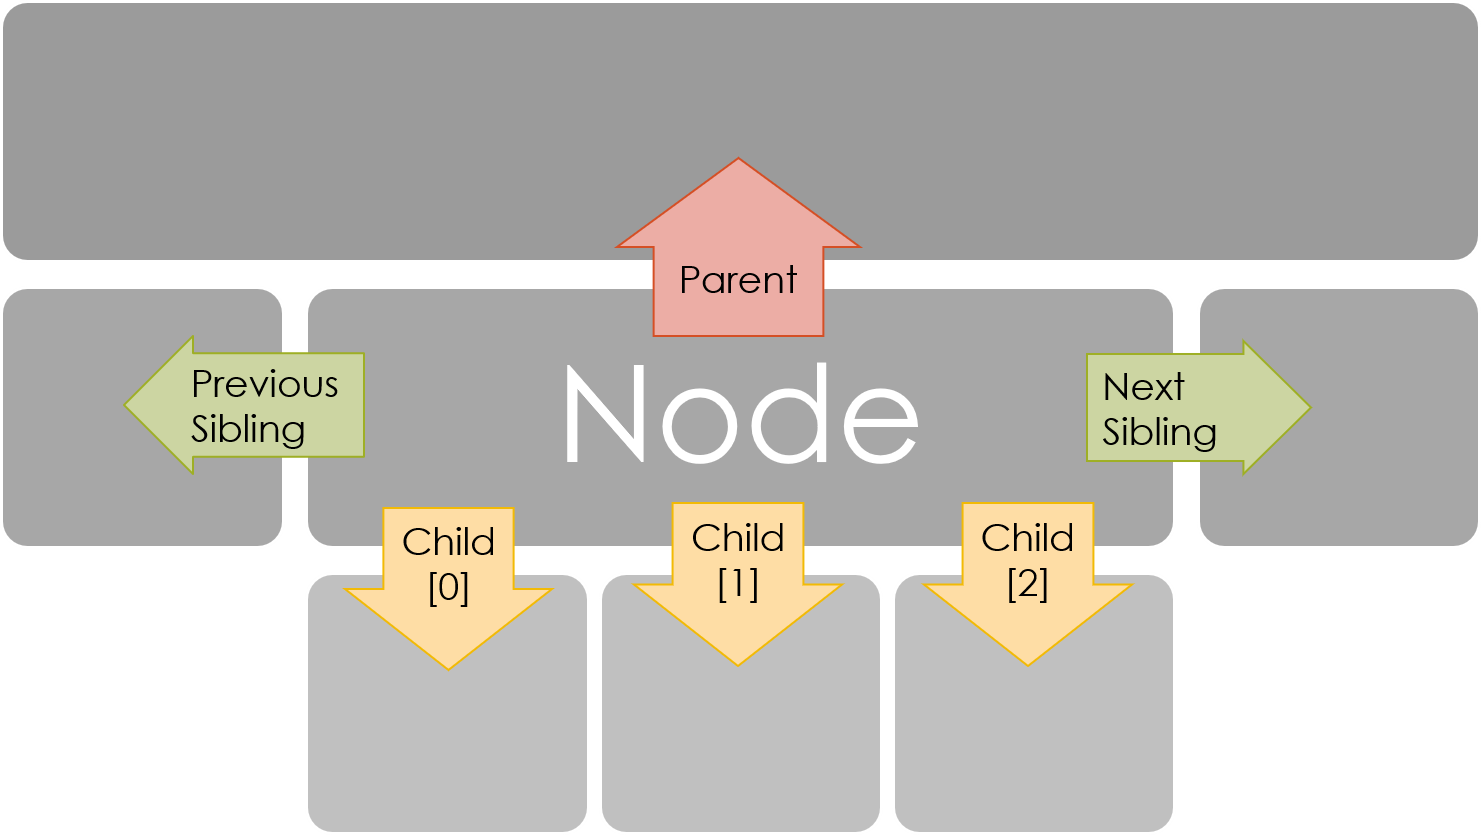
Navigating the DOM
Navigating is relative, based on the current node.
A parent can be reached by moving upwards through the hierarchy, a child by moving downward, and a sibling by moving within the same tier of the hierarchy.
Visualizing the Hierarchy
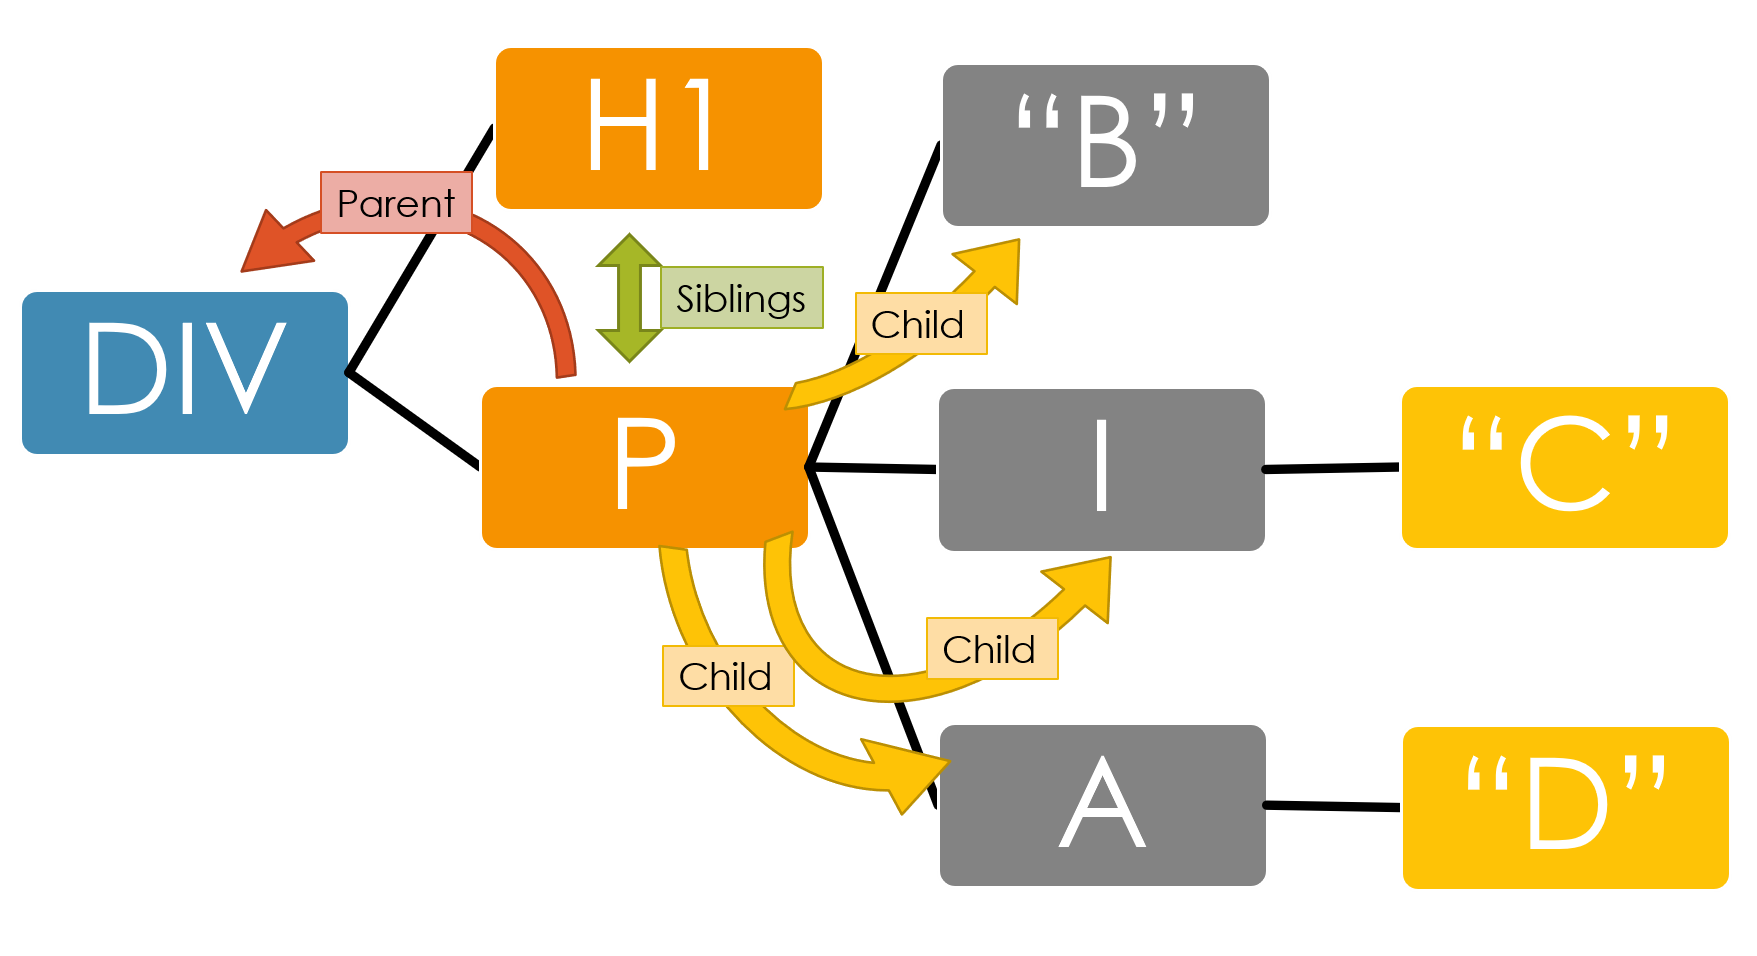
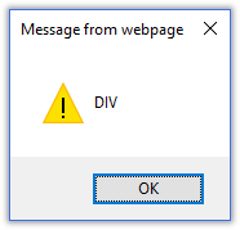
Navigation given P as Current Node
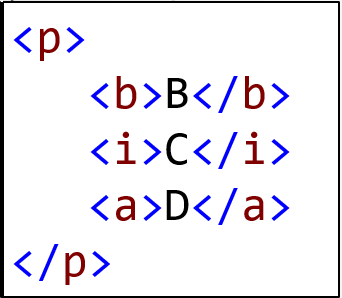
Given the following HTML code:
Node P's parent is DIV, P's sibling is H1, P's children include "B", I, and A.
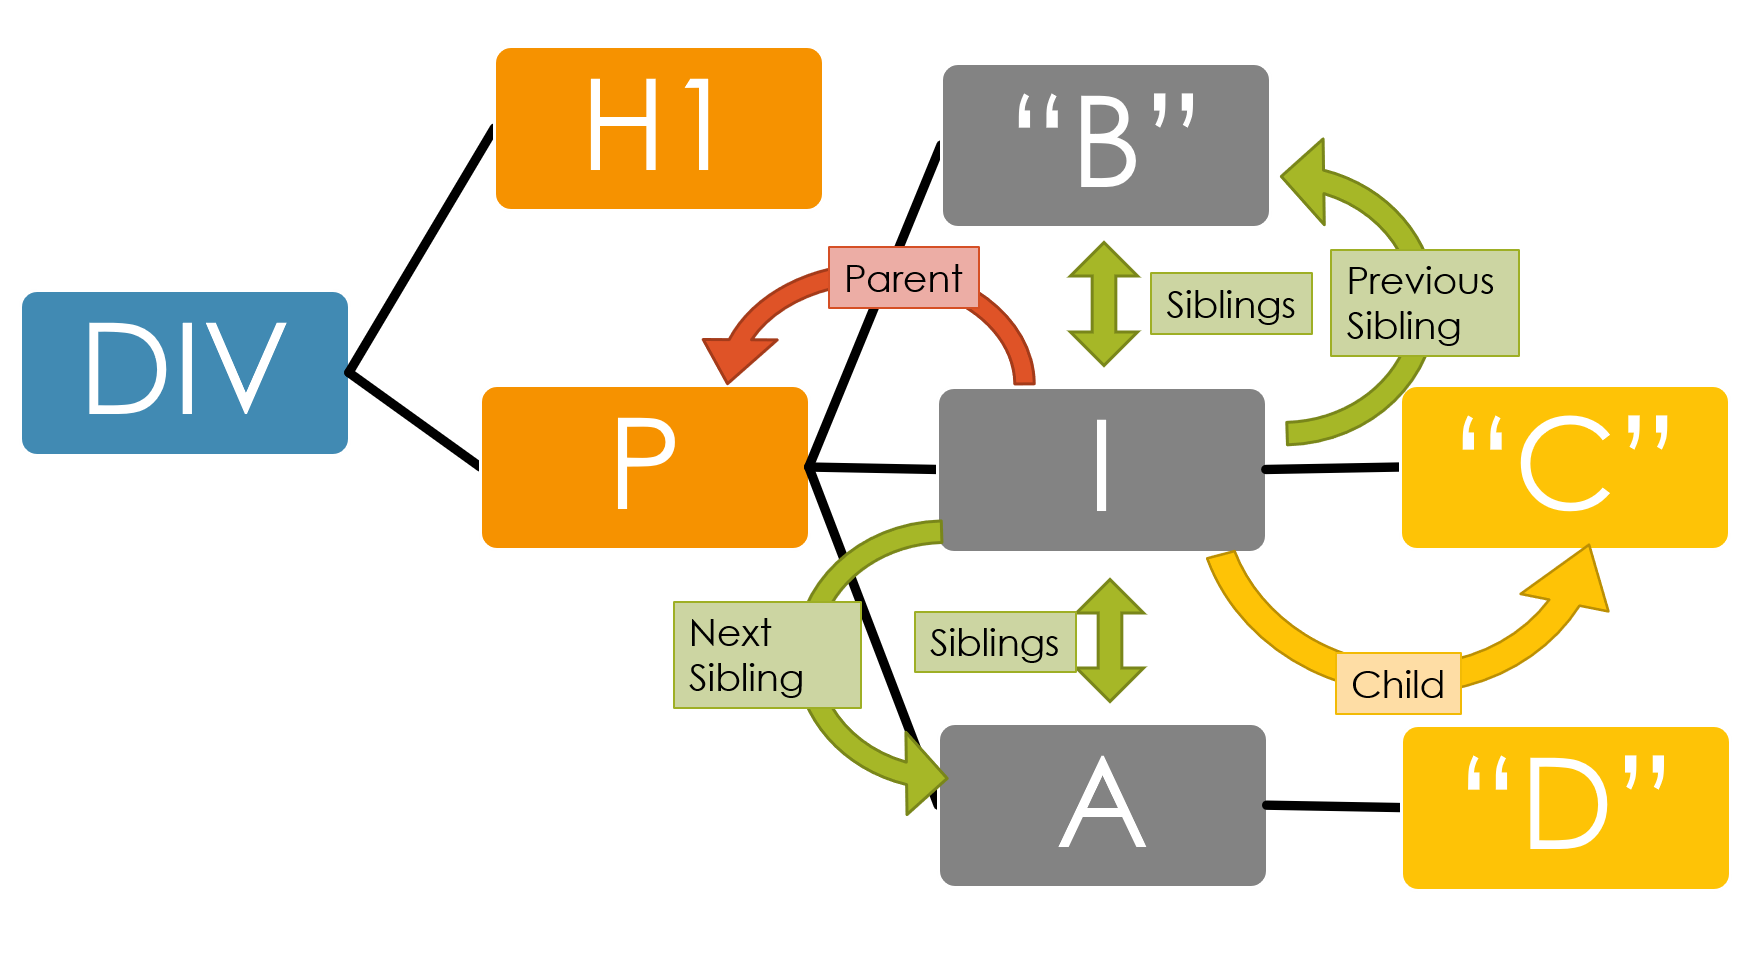
Navigation given I as Current Node
Given the following HTML code:
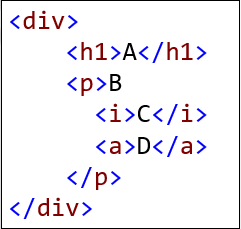
Node I's parent is P, I's siblings are "B" and A, I's child is "C".
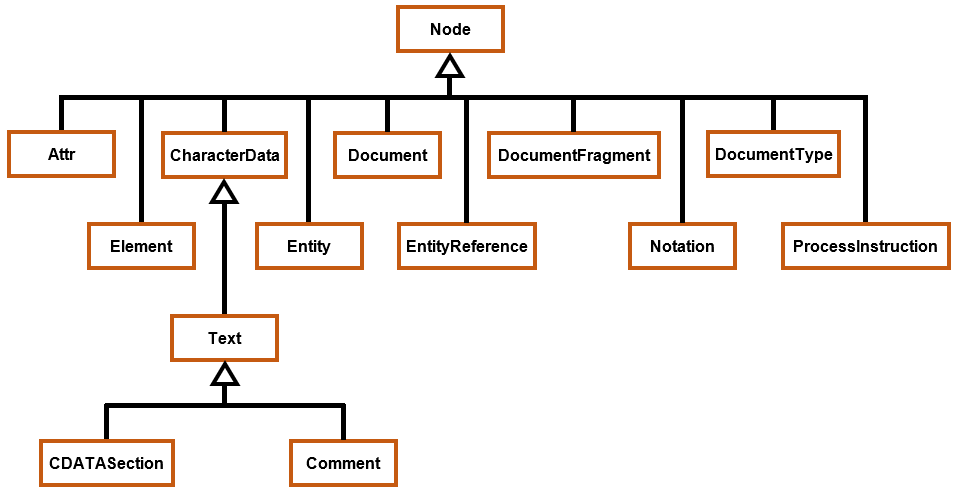
Section 5: DOM Nodes
There are several types of nodes in a DOM hierarchy:
- Document – Root Node
- DocumentFragment – Portion of Document
- DocumentType – Definition of Document
- ProcessingInstruction – How to Process Document
- EntityReference – Reference to part of Document
- Element – An element in the Document
- Attr – A attribute of an element
- Text – Textual content of an element or attribute
- CDATASection – Data that is not parsed
- Comment – Comment in the Document
- Entity – Entity in the Document
- Notation – Notation of Document
The node types listed in bold will be examined more closely.
DOM Document Interface
You may need to review the section on DOM's Document Interface to re-familiarize yourself with getElementById(), getElementsByTagName(), createElement(), createAttribute(), and createTextNode().
Creating Nodes
Methods are provided to create text nodes and element nodes.
- TextNode objects contain only text content without any HTML markup.
- Element nodes correspond to individual tags or tag pairs in the HTML code.
A text node can be created using the createTextNode method:
document.createTextNode("Text of Node");
Element nodes can be created using the createElement method:
document.createElement("tagName");
Both approaches return a new DOM node.
The results of a createTextNode or createElement statement can be assigned to a variable:
var newNode = document.createTextNode("New text node");
Setting or Getting Attributes of Nodes
Node attributes can be set using
-
setAttribute() method
node.setAttribute("attributeName","value")
Node attributes can be accessed using
-
getAttribute() method
var value = node.getAttribute("attributeName")
Setting and Getting Node Text
There four approaches:
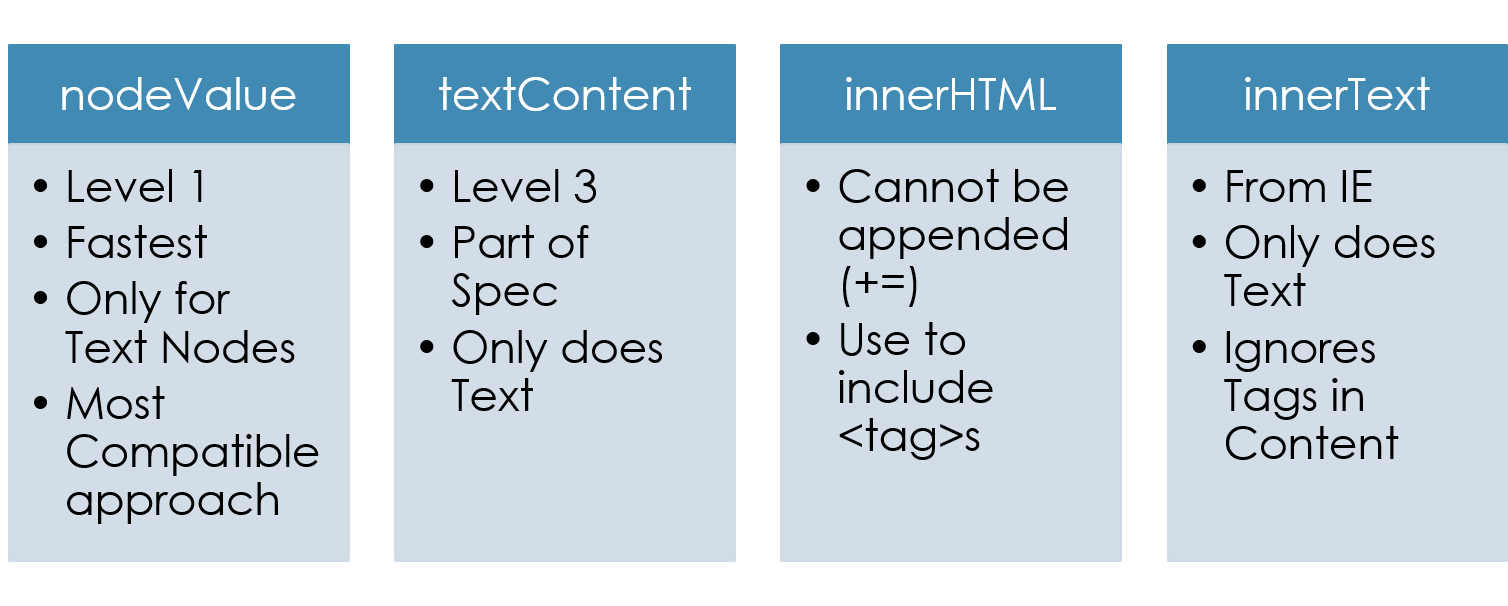
Difference Between textContent, innerHTML, innerText, nodeValue
Node Creation/Manipulation Example
This combination of HTML and scripting
<div id="placeToAdd"></div>
<script>
var newText = document.createTextNode("This is a new text node: ");
var newLink = document.createElement("a");
newLink.setAttribute("href", "http://www.isu.edu");
newLink.innerText = "Link";
var divPlace = document.getElementById("placeToAdd");
divPlace.appendChild(newText);
divPlace.appendChild(newLink);
</script>
Yields the following HTML code:

Node Creation/Manipulation Demo #1
Here is some supplemental info about Adding elements to the DOM.
Node Creation/Manipulation Example 2
This combination of HTML and scripting demonstrates how a node can be created and inserted as a sibling of an existing node by finding the existing node's parent.
<div>
<a id="hypLink" href="http://www.isu.edu">ISU</a>
</div>
<script>
var cobLink = document.createElement("a");
cobLink.setAttribute("href", "http://www.isu.edu/cob");
cobLink.innerText = "CoB";
var hyp = document.getElementById("hypLink");
var par = hyp.parentNode;
par.appendChild(cobLink);
</script>
Yields the following HTML code:
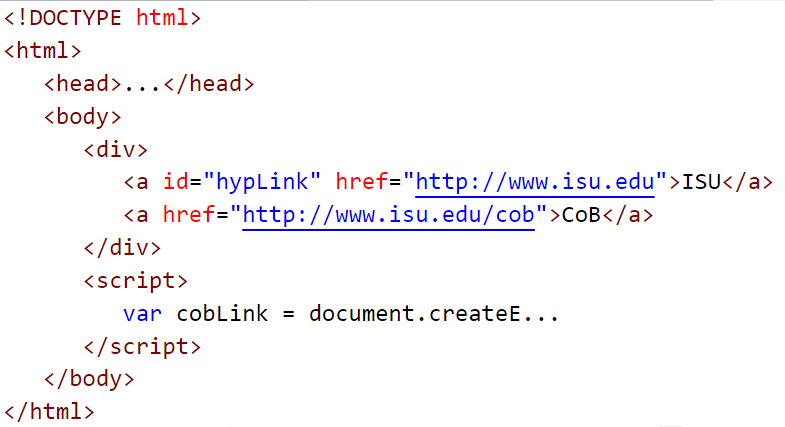
Node Creation/Manipulation Demo #2
Accessing Nodes
Nodes can be accessed from
- document (root node)
- or from any node
When accessing a node, only items under the specified node are accessed.
The following example reads all the list items in an unordered list with the ID "nav" and echoes them on the screen.
<ul id="nav">
<li><a href="../whyInformatics.htm">Why Consider an Informatics Major?</a></li>
<li><a href="https://www.isu.edu/business-informatics/">Informatics in ISU's CoB</a></li>
<li><a href="https://www.isu.edu/cob/faculty--staff/faculty/business-informatics/">Informatics Faculty</a></li>
<li><a href="https://www.isu.edu/">ISU</a></li>
</ul>
<script>
var list = document.getElementById('nav');
var listItems = list.getElementsByTagName('li');
for (var i = 0; i < listItems.length; i++) {
var items = listItems[i];
alert(items.outerHTML);
}
</script>
Accessing Nodes from Nodes Demo
The following example is similar, but it uses the .each() method, which is a DOM traversing method that specifies a function to run
for each matched element, and follows the syntax below:
$('selector expression').each(callback function);
Accessing Nodes from Nodes Demo using .each()
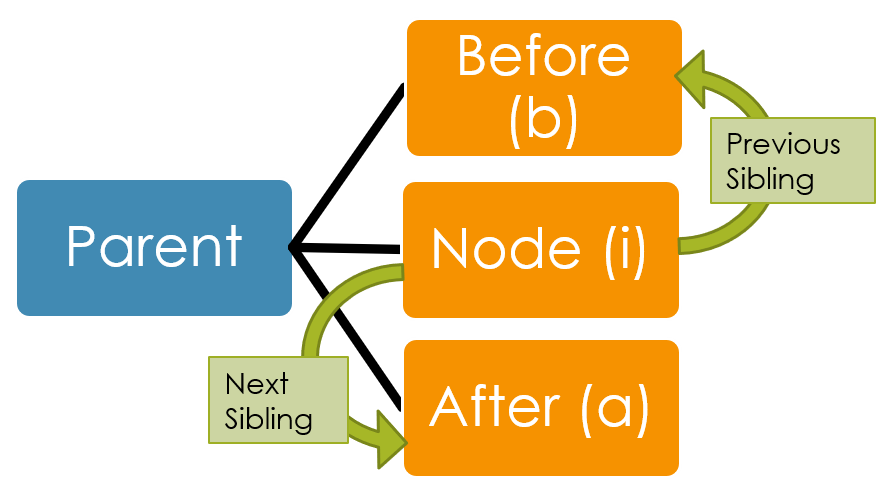
Node Hierarchy – Get Siblings
You can access nodes relative to the current node.
To get the node previous (before) in the DOM tree, use previousSibling.
node.previousSibling;
To get the node next (after) in the DOM tree, use nextSibling
node.nextSibling;
The result of previousSibling or nextSibling can be assigned to a variable:
var nextNode = node.nextSibling;
The following code can be represented as in the illustration.
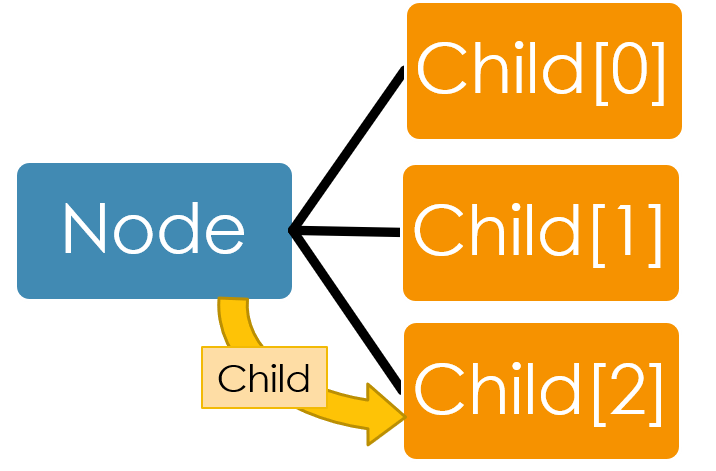
Node Hierarchy – Get Children
You can access nodes relative to the current node.
To get an array of children nodes, use
node.children;
You can get a child node by ID:
node.getElementByID("ID");
You can get all children with a specified tagName:
node.getElementsByTagName("A");
Section 6: jQuery DOM Traversal
The focus will now shift from the DOM and DOM methods, to jQuery DOM methods.
Traversing refers to "moving through", and jQuery traversal methods are used to "find" (or select) HTML elements based on their relation to other elements.
- The jQuery traversal methods make it possible to move up (ancestors), down (descendants) and sideways (siblings) in the tree, starting from the selected (current) element.
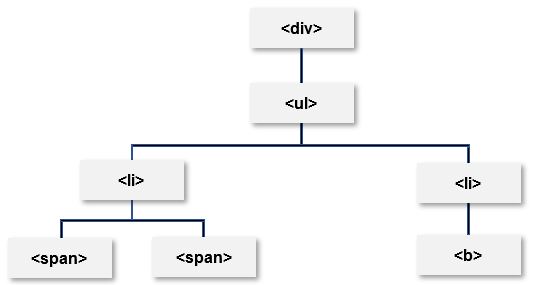
- The <div> element is the parent of <ul>, and an ancestor of everything inside of it
- The <ul> element is the parent of both <li> elements, and a child of <div>
- The left <li> element is the parent of <span>, child of <ul> and a descendant of <div>
- The <span> element is a child of the left <li> and a descendant of <ul> and <div>
- The two <li> elements are siblings (they share the same parent)
- The right <li> element is the parent of <b>, child of <ul> and a descendant of <div>
- The <b> element is a child of the right <li> and a descendant of <ul> and <div>
jQuery provides a variety of methods that allow traversal of the DOM, the largest category of which are tree-traversal.
Ancestors, Descendants, and Siblings, oh my!
- .parent() – get immediate parent in DOM
- .parents() – get all parents up through the document in DOM
- .children() – get immediate children in DOM
- .siblings() – get all siblings in the DOM
- .next() – get next sibling in DOM
- .nextAll() – get all next siblings in DOM
- .prev() – get previous sibling in DOM
- .prevAll() – get all previous siblings in DOM
- .each() – iterate over specified elements; essentially a drop-in replacement of a traditional for or for-in loop
Special DOM filters
Some methods permit use of an optional parameter to filter the search.
- .parents(filter) – get parents based on filter
- .closest(selector) – gets first parent that matches selector
- .children(filter) – get immediate children based on filter
- .find(selector) – get any elements below in the DOM that match selector
- .parentsUntil(selector) – get all parents up to but not including selector
Example
$(document).ready(function(){
$("span").parents("ul");
});
The preceding example returns all ancestors of all <span> elements that are <ul> elements:
Note:
jQuery results always return an array of jQuery objects.
- If nothing matches, an array of length 0 is returned.
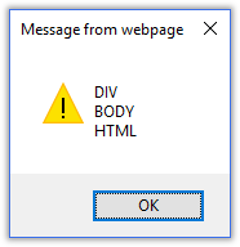
Example 1 – Using parent() and parents()
HTML
<body>
<a href="">My Link</a>
<div id="divOne">
<p class="mark">One</p>
<p class="flag">Two</p>
</div>
</body>
jQuery
<script>
$(document).ready(function () {
var f = $(".flag");
alert("#1 " + f.parent()[0].tagName);
var p = f.parents();
var s = "";
for (var i = 0; i < p.length; i++) {
s += p[i].tagName + "\r\n";
}
alert("#2 " + s);
});
</script>
Results
Alert #1
Alert #2
Demo - Using parent() and parents()
The following demo performs the same task as the previous demo, but it uses the $.each() iterator instead of a for loop.
Demo - Using parent(), parents(), and each()
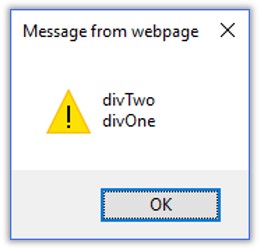
Example 2 – Using parents() - filtered
HTML
<body id="bdyOne">
<a id="lnkOne" href="">My Link</a>
<div id="divOne">
<div id="divTwo">
<p>Find it</p>
</div>
<div id="divThree">
</div>
</div>
</body>
jQuery
<script>
$(document).ready(function () {
var f = $("p");
var p = f.parents("div");
var s = "";
for (var i = 0; i < p.length; i++) {
s += p[i].id + "\r\n";
}
alert(s);
});
</script>
Results
Alert
Demo - Using parents() - filtered
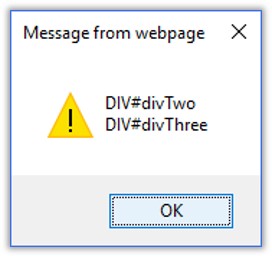
Example 3 – Using children()
HTML
<body id="bdyOne">
<a href="">My Link</a>
<div id="divOne">
<div id="divTwo">
<p id="pOne">One</p>
<p id="pTwo">Two</p>
<p id="pThree">Three</p>
</div>
<div id="divThree">
</div>
</div>
</body>
jQuery
<script>
$(document).ready(function () {
var f = $("#divOne");
var c = f.children();
var s = "";
for (var i = 0; i < c.length; i++) {
s += c[i].tagName + "#" + c[i].id + "\r\n";
}
alert(s);
});
</script>
Results
Alert
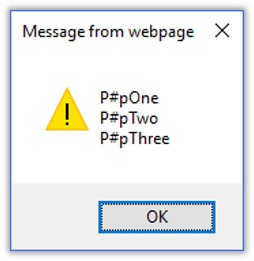
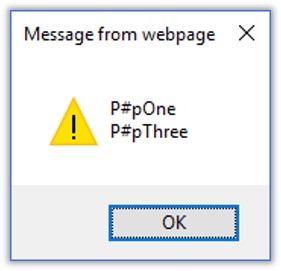
Example 4 – Using find()
HTML
<body id="bdyOne">
<a href="">My Link</a>
<div id="divOne">
<div id="divTwo">
<p id="pOne">One</p>
<p id="pTwo">Two</p>
<p id="pThree">Three</p>
</div>
<div id="divThree">
</div>
</div>
</body>
jQuery
<script>
$(document).ready(function () {
var f = $("#divOne");
var c = f.find("p");
var s = "";
for (var i = 0; i < c.length; i++) {
s += c[i].tagName + "#" + c[i].id + "\r\n";
}
alert(s);
});
</script>
Results
Alert
Example 5 – Using siblings()
HTML
<body id="bdyOne">
<a href="">My Link</a>
<div id="divOne">
<div id="divTwo">
<p id="pOne">One</p>
<p id="pTwo">Two</p>
<p id="pThree">Three</p>
</div>
<div id="divThree">
</div>
</div>
</body>
jQuery
<script>
$(document).ready(function () {
var f = $("p#pTwo");
var c = f.siblings();
var s = "";
for (var i = 0; i < c.length; i++) {
s += c[i].tagName + "#" + c[i].id + "\r\n";
}
alert(s);
});
</script>
Results
Alert
jQuery Traversing Filtering
The most basic filtering methods are first(), last() and eq(), which allow you to select a specific element based on its position in a group of elements.
The has() method returns all elements that have one or more elements inside of them, that matches the specified selector.
The slice() method selects a subset of elements based on its index, and is used to limit the selection of elements in a group, by a start and end point.
- .first() get the first element from the query
- .last() get the last element from the query
- .eq(index) get the element at the index given from the query
- .filter(selector) get only elements that match the selector
- .not(selector) get only elements that do not match the selector
- .has(selector) get only elements that have children matching the selector
- .slice(indexStart, indexEnd) – get only elements between indexes
Section 7: jQuery's Getting and Setting Content
The simplest aspect of jQuery's DOM manipulation is retrieving and setting text, values and HTML.
The jQuery Tutorial: Getting and setting content [text(), html() and val()] explains the jQuery options very well.
Section 8: jQuery's Document Interface
getElementById()
The jQuery "equivalent" of document.getElementById("someId") is $('#someId').
- The two are not the same since the jQuery version returns a jQuery object, not a DOM object.
- To get the DOM object in the jQuery collection at index 0 use
$('#someId').get(0);or$('#someId')[0];.
The jQuery statement $('#someId').val(); returns the value of a DOM node, much like document.getElementById("someId").value.
This page is a good reference.
getElementsByTagName()
The jQuery equivalent of getElementsByTagName() is $('elementname'), such as $('div').
createElement()
The jQuery equivalent of createElement() is createElement().
Read more here.
createAttribute()
To create an attribute in jQuery you use the jQuery attr() method.
Read more here.
createTextNode()
There is no equivalent in jQuery for createTextNode, but you can use something like
$('selector').append(document.createTextNode('some text')).
Section 9: CSS Manipulation
The jQuery library includes various methods to manipulate style properties and CSS class of DOM element(s).
The following table lists jQuery methods for styling and css manipulation.
| jQuery Methods | Description |
|---|---|
| css() | Get or set style properties to the specified element(s). |
| addClass() | Add one or more class to the specified element(s). |
| hasClass() | Determine whether any of the specified elements are assigned the given CSS class. |
| removeClass() | Remove a single class, multiple classes, or all classes from the specified element(s). |
| toggleClass() | Toggles between adding/removing classes to the specified elements. |
Please visit this jQuery CSS methods tutorial for more details on the jQuery CSS methods
Points to Remember:
- The jQuery CSS methods allow you to manipulate CSS class or style properties of DOM elements.
- Use the selector to get the reference of an element(s) and then call jQuery css methods to edit it.
- Important DOM manipulation methods: css(), addClass(), hasClass(), removeClass(), toggleClass() etc.
Section 10: Form Manipulation
You can access forms in a variety of ways.
Given the following HTML code for a form:
<form id="frmOne" action="mypage.html" method="post">
<label for="txtName">Name:</label>
<input id="txtName" type="text" name="User" />
<input type="submit" value="Send it" />
</form>
You can access the form using getElementById, forms and its namedItem, or even the form ID.
<script>
var frm1 = document.getElementById("frmOne");
var frm2 = document.forms.namedItem("frmOne");
var frm3 = frmOne; // where did this come from?
alert(frm1.id == frm2.id);
alert(frm1.id == frm3.id);
</script>
Both alerts return True.
Here is a version that uses jQuery to get the form element.
Accessing Form Elements
Forms contain elements
- Elements are parts of the submitted form
Form elements can be accessed through the DOM.
Using the following form:
<form id="frmOne" action="mypage.html" method="post">
<label for="txtName">Name:</label>
<input id="txtName" type="text" name="User" />
<input type="submit" value="Send it" />
</form>
The following code shows how to reset and submit a form, and also demonstrates another approach for accessing form elements, the elements method.
<script>
var frm = document.getElementById("frmOne");
frm.reset(); // reset (clear) the form
var el1 = frm.elements[0];
var el2 = document.getElementById("txtName");
alert(el1.id === el2.id);
frm.submit(); // submit the form
</script>
Example: Using the DOM on Forms
THe following code iterates through the form elements, displaying the type of each.
<script>
//get array of all forms on the page.
var frms = document.forms;
for (var f = 0; f < frms.length; f++) {
// get array of all elements in a form.
var elems = frms[f].elements;
for (var e = 0; e < elems.length; e++) {
// this will iterate every element
// on every form on the page.
var ele = frms[f].elements[e];
// the following line does the same as the preceding line, but uses a different approach
var ele2 = elems[e];
alert(ele2.type);
}
}
<script>
Example: Reset all Forms
While an earlier example reset a specific form, the following code resets all forms on a page.
//reset (clear) every form on the page
var frms = document.forms;
for (var f = 0; f < frms.length; f++) {
document.forms[f].reset();
}
Example: Canceling form post
You can cancel any event by having the event handler return false.
Given the following html:
<form id="frmOne" action="mypage.html" method="post">
<input type="submit" value="Submit" />
</form>
The following code will cancel the form submission upon submission.
<script>
document.getElementById("frmOne").onsubmit = function () {
alert("This calls the form submission.");
return false;
}
</script>
Example: Must use a return statement
To cancel a post, the code must include a return statement that returns false.
Given the following function:
<script>
function cancelButton() {
return false;
}
</script>
<!-- This does not work, because the event must return false -->
<button onclick="cancelButton();">This does not work</button>
<!--This one does work -->
<button onclick="return cancelButton();">This works</button>
<!--This one also works -->
<button onclick="cancelButton(); return false;">This works too</button>
When the first button is clicked, it fails to cancel the form action and navigates to the subsequent page.
When the second button is clicked, it returns false and successfully cancels the form action.
When the third button is clicked, it contains an explicit "return false;" and successfully cancels the form action.
Section 11: Form Validation
Given the following HTML code:
<form action="true.html">
<label for="txtEntry">Enter true</label>
<input id="txtEntry" type="text" />
<input type="submit" value="Try it" />
</form>
<script>
document.forms[0].onsubmit = function () {
var val = document.getElementById("txtEntry").value;
if (val == "true") {
//we will go to the true.html page.
} else {
alert("You did not follow directions!")
//we will stay here.
return false;
}
}
<script>